How to start from Zero and begin your journey to Hero.
Just starting and new to the show? Then Gloomingdeep is where to go! -- Bonzz
New to EverQuest?
Returning to EverQuest after a long hiatus and basically starting over?
Starting fresh on a TLP server where coin and gear is scarce?
Starting a new Character Class Type you have never played before?
Made a new Persona and need to get it up and running?
Making a new Character for the first time in ages and aren't sure where to start?
Well! You have come to the right place!
EverQuest is the innovative MMORPG that started it all. EverQuest is a humongous, ever-evolving game that has social aspects along with a myriad of play style options, activities and pursuits.
Abandon the 'I want it now' approach and you just might find that EverQuest is a fun and enjoyable past time, that you will want to keep playing (or may find yourself coming back to after testing the green pastures of other games that were not actually greener, after all)!
1) FREE TO PLAY: Before you get rolling, you should understand the differences between Free to Play (aka F2P or FTP) and All Access (paid subscription).
You can absolutely 100% play EverQuest for FREE.
If you do so, however, it does mean that limitations are imposed on your Account / Characters.
The Free to Play (FTP or F2P) Limitations include:
You will not be able to play in the most recent two (2) expansions.
You can expand on, or work around some of the above restrictions, without going All Access, but it does require purchases (Marketplace, Loyalty Vendor...), Quests and Player-to-Player Trades to do so. More details / options are noted below.
If you do, most all of the restrictions are removed!
About the only restriction that does apply is that you will not be able to play in the most recent two (2) expansions.
In short, if you are Free to Play, the best server to play on might just be the Test Server.
If you created your Character on a different server, you can use the command /testcopy to 'copy' your Character to the Test Server, albeit not necessarily 100% as is (see here for what gets copied over).
.
2) ALL ACCESS: You can also opt to pay for EverQuest, aka All Access.
If you do, all the restrictions noted above are eliminated.
Additionally, you also get a 10% reduction in Marketplace prices and 500 FREEDaybreak Cash that you can claim every month.
On a side note, you can go All Access temporarily (such as using a Krono) and exceed F2P limitations while you are All Access. See below for more details.
1)FREE ACCOUNT: Before you can start playing EverQuest, you will need to create an account by way of a simple registration process with Daybreak Games.
All you need have do is 'Register' to create your Free to Play Account.
To do this, simply go the EverQuest web site, here.
This registration requires establishing a User Name (aka Account Name) and a Password (both are needed / used to log into the game and the Daybreak / EverQuest web sites).
You will also need to provide a valid E-Mail Address (for verification / contact purposes), what Country you live in and your Date of Birth (EverQuest is rated 'T' by the ESRB).
Registration does not require your name, address, phone number or any sort of payment information.
You will get an e-mail (from Daybreak Games) to verify that your E-Mail address is valid.
You can log in and Play only one (1) Character at a time with this account.
It is possible to Play more than one (1) Character at a time, but that requires additional account(s). See the 'Boxing' section below.
.
2) ALL ACCESS ACCOUNT: You can use Krono, acquired from other Players (gifts, trades, purchased with Platinum...), instead of adding a Payment Source.
Obtaining and using (clicking / claiming) a Krono will credit you for one (1) month of All Access (the Krono will be expended... aka go poof).
To maintain All Access in this way, you will need to continue to acquire Krono each and every month, otherwise your account will revert back to Free to Play.
Even if you do not intend to go All Access, you will still need to do this if you intend to make any purchases from Daybreak (such as an Expansion, etc.), at all.
If you decide you want to go ahead add a Payment Source, you will need to provide much more specific information.
To do this, go to the Daybreak Games web site (here).
In the top right, you should see a drop down select menu called 'Log In.'
Click it and select 'Account Management' (see image, below).
You will then need to log in (with your User Name and Password, as established above).
Once logged in, you will be taken to the Account Management page, where one of the selections / categories is for 'Payment Sources.'
Click that to add a Payment Source (a 'Payment Card') and provide the required information.
The required information will include include your Name, Address, Card Number, Security Code and Expiration Date.
This payment source will be used to pay for your Account (subscription), as well as other purchases (such as Daybreak Cash, Expansions and so forth).
If your All Access lapses, it will revert to Free to Play (you will not technically lose anything, but many restrictions will be imposed).
.
3) SUBSCRIPTION (AKA MEMBERSHIP): Now that you have established a Payment Source, you now need establish 'membership' (subscribe) to finish making your account an All Access account, if that's what you want to do.
On the that same Account Management page (from Step 2), you should see the a selection / category for 'Membership Info.'
Click it and it will take you to a page that is about your Membership (subscriptions).
However, as a new 'member,' there is no info to show, so instead, you should see an ad to for All Access, with a button marked, 'GET ALL ACCESS!'
Click it! This will take you to another page where you can select a 'Membership Plan' of 1 Month, 3 Months, 6 Months or 12 Months (which is the best overall value) and the related pricing.
If you are not from the USA, there is a drop down selection menu (top right side) to show the pricing in the currency of several other Countries, instead of US Dollars.
Select one.
You are also given the option (further down the page) to add one (1), two (2) or all three (3) 'Perk' types (for additional costs).
Perks are 100% optional and you do not need to have any of them to play EverQuest. Your call!
You can also select if your payment / subscription will renew automatically or not.
If you selected automatic renewals, with each Membership cycle (1 Month, 3 month, etc.) your payment source will be automatically charged and your All Access membership will be uninterrupted.
If you do not select automatic renewal, then your All Access Membership will end, until such time as you renew it manually. Meanwhile, you will be reverted to F2P status and restrictions.
As a note, you can acquire and use Krono (from other Players) as an alternative method to pay for your account (instead of actually paying real money for your account)... but you will not get the 500 free Daybreak Cash each month.
Click here for details about acquiring and using Krono.
1) DOWNLOAD: Once you have registered, you now need to Download and Install EverQuest in order to play.
To Download EverQuest, go to the Daybreak web site, here.
At the top of the page, there is a drop down select menu called 'GAMES' (see image below).
Click it and a number of games will appear in the drop down, with one of them being EverQuest along with a 'DOWNLOAD' button below the graphic.
Click the 'DOWNLOAD' button and a window will pop up to allow you to select where to download the 'EQ_setup.exe' file to your computer.
2) INSTALL: Once the 'EQ_setup.exe' file is fully downloaded to your computer, you can install EverQuest.
Click (run) the 'EQ_setup.exe' file to start the install.
You will be asked where you want to Install EverQuest on your Computer, or just go with the default location shown.
You will be asked to 'Accept' agreements (if you do not accept, you will not be able to install EverQuest).
DirectX will be part of the install.
NOTE: The DirectX install will want to also install 'Bing Bar' to your computer (your option).
Simply uncheck the box if you want to stop the 'Bing Bar' from also being installed (recommended).
.
3) PLAY EVERQUEST:An EverQuest shortcut (icon) will be added to your Desktop.
Click the Short Cut to start up the EverQuest LaunchPad.
LaunchPad is the gateway to EverQuest. It will check for updates and allow you to switch accounts, if you have more than one account (top middle drop down select menu)... and do other things (such as the 'Advanced Tools' button on bottom left).
Click the 'PLAY' button (bottom right) to start EverQuest.
This will take you to the 'Sever Select' screen, where you can choose which server you want to log into / play on.
Free to Play will be restricted as to which Servers can be selected (i.e. no TLP Servers).
Servers are all versions of the same EverQuest (Live), but some are special rules servers (variants to the actual game, such as a TLP).
Select a Server and you will be taken to the 'Character Select' Screen.
This screen will allow to to select a Character to Play, if you have all ready created any Characters.
If you have not created any Characters on the Server, you will be able to Create one (see below).
Simply highlight a Character to select it and then click the 'Play EverQuest' button below (bottom left).
Your Character will now enter the game, so you can play!
However, you may want to do some set-up before you start adventuring. See below.
1) CREATING A CHARACTER: If you are playing EverQuest for the first time; or playing on a Server for the first time; you will need to create a Character.
Or, you can just crate a new Character because you want to, for what ever reason.
Character Creation is limited to how many Character Slots you have.
Character Slots are simply a limit for the number of Characters you can create on any given Server.
The number of Character Slots you have is Account Wide, but they apply individually to each server.
Thus, if you have two (2) Character Slots, you can create two (2) Characters on every Server, if that is what you want.
However, you can only actively play one (1) Character at a time.
You can increase the number of Character Slots you have by way of the Loyalty Vendor ('Doll of Character'), the Marketplace ('Character Slot') or by going All Access.
The maximum number of Character Slots your account can have is twenty (20)... three (3) via the Loyalty Vendor; nine (9) via the Marketplace; and eight (8) with All Access).
2) CHARACTER SCREEN: After you log in and select a Server, you will be taken to the Character Screen.
If you all ready have Characters on the Server, you will see them listed here.
If you do not have any Characters on the Server, you will need to create a Character.
On the left side of your screen, you will see some buttons / selections. Using the image to the right, they are for:
(2) A list of any Characters you have all ready created on the Server, with how many a notation of how many Character Slots you have (bottom of the window), along with a 'Buy Slot' option, if available, to purchase another Character Slot;
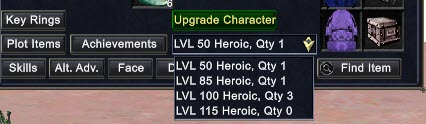
(3) A drop down menu to see how many Level 85 and / or Level 100 Heroic Characters you have available to use (if you don't have any, and want one before you create a new Character, there is a 'DB' button on the bottom right side of the screen that you can click that will take you to the Marketplace);
(4) The 'Upgrade Character' will allow you apply a Heroic (from #3) and 'upgrade' any Character you select (highlight) in the second window;
(5) The 'Create Character' button allows you to create a new Character, if you have the Character Slot (#2) to do so (see below for more on creating a new character);
(6) The 'Delete' button allows you to literally delete any Character you select in the Characters window (#2), but be warned, this is permanent if you do this;
(7) The 'Enter Tutorial' button will allow you go into the Tutorial (Gloomingdeep), but only if you are low enough Level to still be allowed in;
(8) The 'Return Home' button will allow you to log in at your home city, rather than where ever you were when you last camped, or instead of the Tutorial;
(9) The 'Reset UI to Default' will revert EverQuest to the original default User Interface (I suggest you never check this box, as any personal changes you have made will be replaced and you will have to re-d0 / reload them);
(10) The 'Go All Access' button will open your browser to the EverQuest web site, to allow you to set up All Access, if desired (if you are all ready All Access, you will not see this button);
(11) The 'Quit' button will take you back to the Server Select Screen, so you can change servers.
.
3) CHARACTER CREATION SCREEN: If you select the 'Create Character' option (see above), you will then see the Character Creation Screen.
Using the image below:
(1) Select a race for your Character. There are sixteen races you can select from (sometimes referred to as 'Player Races'). Races do have differences in more than just their appearance (race) to include hometown options; deity options; specialty tradeskills (i.e. Gnomes and Tinkering); special abilities (like Hide); your initial faction standings; and more.
(2) Select a sex for your Character. Male or Female, they are equal in ability.
(3) The 'Help' window offers tips / advice as you create your Character.
(4) Select a Class for your Character. Class options will be limited by the race you selected (1). Classes are all unique from each other, in one way another, to include the type of weapons they can use; if they can cast spells or play songs or not; the type of armor they can wear (Plate, Chain, Cloth, Leather); if they have any special Tradeskills (i.e. Alchemy or Poison Making); they type of spells they can use (if they can use spells); and much more.
(5) A drop down select menu that will allow you to chose a deity to follow, or to be agnostic (no deity). Once established, this can not be changed. Your options will be limited by the race (1) and class (4) you chose. Deity selection also play a role on if your Character is technically evil, good or neutral and can also play a role in being able to use certain spells (such as Shaman imbue spells) and perhaps, your initial factions.
(6) A drop down select menu that will allow you to chose a starting city, or what will be your hometown. Once established, this can not be changed. Your options will be limited by the deity (5) race (1) and class (4) you chose.
(7) The 'Appearance' button will allow you to change the appearance of the Character you are creating and should all ready see on the screen (15). This include hair styles, facial hair, eye color, hair color and so forth.
(8) The 'Advanced' button.................
(9) The 'Tutorial' button is all ready selected (clicked), so that you will go directly into the Tutorial (Gloomingdeep) when you hit 'Enter World' (13). However, if you want to by-pass the Tutorial you can, by simply unclicking the button.
(10) The 'Cancel' button will allow you to cancel the Character Creation process.
(11) This drop down select menu reveals how many, if any, Level 85 and / or Level 100 Heroic Characters you have available to use, if any.
(12) The 'Heroic Character' will allow you to make these new Character a Heroic Level 85 or Level 100 Character right away, if you have one available to use (11, select one, then press the 'Heroic Character' button).
(13) Once you are good with your Character Creation, click the 'Enter World' will log you into the game.
(14) This window will allow you to get a 'Random Name' (click the button) or type in a name of your won choosing. If you type in an name yourself, it may, or may not be accepted, based on if it is all ready used on the Server or doesn't meet community standards (don't be vulgar!). If it is not accepted, try again (vary the spelling, phonics or try something all together different).
(#16) This is an image (look, appearance) of the Character you are creating.
They can be used on a Character you all ready have or just created.
In the past, a free Heroic Boost have been known to be awarded to Players (for free), as a promotional event.
Heroic boosts have also been awarded with certain Expansion package options.
You can potentially acquire a 'Tradable' Heroic Character Boosts from other Players, instead of purchasing one (often included with the 'Family & Friends' edition of new expansions).
In May 2026 they added several 'Heroic Experience Draught' to the Marketplace. These potions only boost your Character to the noted Level(s). There are no other inclusions (no gear, no nothing). These potions (Level 45, 55, 60, 65, 70, 75, 80, 90, 95, 105 & 110) range in price from 2,000 DBC (Level 45) to 3,850 DBC (Level 110). It does appear, however, that simply sticking with Heroic Character boosts (Level 50, 85, 100 or 115) are a better deal, as they are only marginally more expensive than the Heroic Experience Draught just below them (level wise), as they include a load of included things.
All Heroic Character purchases stay credited to your Account.
It just can't be used for more than one (1) Character at a time.
If you delete a Heroic Character, the Heroic Character Boost should become available for you to use again.
Heroic Boosts used on Personas, due how they work, are essentially permanent expenditures.
You can not delete a specific / individual Persona once it is created.
Thus, Heroic Boosts applied to a Personas is, therefore, permanently expended.
That is, of course, unless you apply an higher Heroic to the same Persona.
. 2) APPLYING HEROIC CHARACTER BOOSTS: Applying a Heroic Character Boost is accomplished on the Character Screen / Character Creation Screen.
Barring server restrictions, a Level 50 Heroic Characters can not be applied on a TLPServer until the Planes of Power expansion is unlocked on the TLPServer.
Barring server restrictions, a Level 85 Heroic Characters can not be applied on a TLPServer until the Call of the Forsaken expansion is unlocked on the TLPServer.
Barring server restrictions, a Level 100 Heroic Characters can not be applied on a TLPServer until the Torment of Velious expansion is unlocked on the TLPServer.
Barring server restrictions, a Level 115 Heroic Characters can not be applied on a TLPServer until the Shattering of Ro expansion is unlocked on the TLPServer.
.
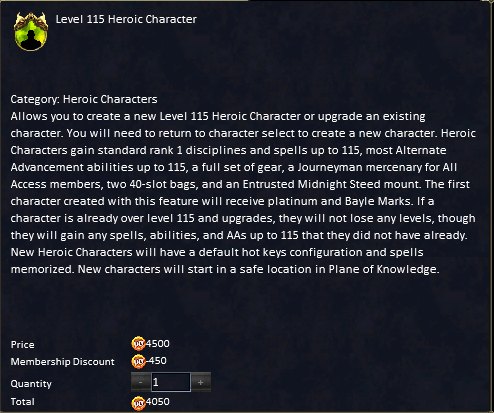
3) NEW HEROIC CHARACTERS: When you create a new Character (explained above), you start at Level 1.
However, if you purchase or acquire a Heroic Character Boost (or all ready have one credited and available to your account), you can instantly boost that Character, instantly, to Level 50, Level 85, Level 100 or Level 115... instead of starting at Level 1.
Heroic boosts are most beneficial when applied to a brand new Character (see above).
Level 50 Heroic Characters (added to the game via May 2024 patch) get:
An immediate Level Boost to Level 50.
Awarded Character Class-Related Alternate Advancement (similar to Auto Grant) (up to the Level 50).
Level related Spells (Rank I), Songs (Rank I), Disciplines (Rank 1) and Skills (up to the Level 50, not to include Languages and Tradeskills).
A full set of Level related 'Bestowed' Gear (Armor, Weapon(s)...).
NOTE OF EXPLANATION: You can re-Boost Heroic Characters. Example you boost a Character to Level 50. You can then, afterwards, apply a Level 85, 100 or 115 boost to that same Character!
The lower Level Heroic boost will become available again.
You can see what Heroic boosts (by Level) that you currently have available to use at the bottom of your Character Inventory screen (click the arrow below the 'Upgrade Character' button in the bottom middle).
.
4) APPLYING HEROIC TO EXISTING CHARACTERS: You can apply a Heroic Boost to any Character....
Newly created Characters.
Heroic Boosts are most beneficial when applied to a brand new Character (as noted above).
A Character of any Level.
Even if the Character are above the Level that the Boost applies (to include max Game Level).
NOTE: There is no real benefit to applying a Heroic Boost to an existing Character that is all ready above the Level that the Boost provides, other than a personal desire to get the gear / rewards that come with it.
Characters that all ready have a Heroic Boost applied.
The Boost that has all ready been applied will be made available to use again.
Boosts that are made available to use again (recycled) will no longer include the goodies (gear, etc.), they will just be a straight up Level Boost.
If you do apply a Boost to an existing Character that is above the Level of the that Boost provides...
You do NOT get downgraded / lose any Levels.
You do NOT lose anything that you all ready have.
You will get Quest Reward Windows that allow you to claim items / awards for the Level of the Boost you just applied (gear, stat food / drink, etc.).
You will get Spells (Rank I), Songs (Rank I), Disciplines (Rank 1) and Skills (not to include Languages and Tradeskills), that you did not all ready have, up to Level 115 (depending on which Boost you used).
NOTE: It is possible you may not get any Skill boosts at all if you all ready had them skilled up.
You will get Character Class-Related Alternate Advancement (AA's) (similar to Auto Grant) that you did not all ready have, up to Level 115 (depending on which Boost you used).
NOTE: It is possible you may not get any at all if you all ready had them all.
1) PRE-REQUISITES: Now that you are ready to go with EverQuest, I strongly suggest you do some pre-requisite setting up before you start adventuring.
If you do, I 100% believe, going forward, that it can and will save no small amount of frustration, grief, time and effort and it will improve your overall EverQuest experience!
I actually know more than one (1) long time, experienced, max Level, max AA Players who... to this day... on a daily basis... struggle from their own disorganization / preparation / habits.
Not only are they frustrating themselves and wasting time on a daily basis, but they are cutting in on their own play time... and even the play time of others who may be waiting on them to get it together!
So, spend the time and start your 'good' EverQuest habits now!
It can be tedious to start with, but once certain things are 'in place' playing EverQuest is a much better experience.
.
2) LAP TOP VS DESK TOP: You can 100% play EverQuest on a Lap Top Computer (Windows)... or a Desktop Computer (Windows).
So, if all you have is a Lap Top, or a Desk Top... you are good to go!
If you have both, or multiple computers, you can install and play EverQuest all of them.
You can even play the same account on any of them, just not at the same time.
However, you can play different accounts at the same time, on separate Computers (or on the same computer), if you want to box.
If you want the option of playing your Account on either a Desk Top (such as at home) or a Lap Top (such as away from home), keep in mind that thing are not all stored on the EverQuest Servers.
Some things are, instead, stored on your computer (such as settings, maps, advanced loot, spell / song / disc set ups, hot buttons and others).
To keep both computers 'in sync' there are files that can be copied back and forth.
However, even if you don't do this, you can still play EverQuest without any huge concerns, really.
Also, keep in mind that the quality of your computer can effect game play (memory, graphics card, speed, etc.).
Additionally, the way you connect to the internet can also play into the quality of you game play experience (Wi-Fi vs. Hot Spot vs. directly (wired) connected).
Additionally, since both a keyboard and a mouse are best used with EverQuest, a 'roomy' flat surface (like a desk) is better than impromptu / smaller surfaces.
A mouse is also better than a touch pad, in my opinion (you can use a mouse with a laptop).
You will find that the EverQuest window can be a bit crowded, so larger screens are better, but may Players opt to Play with a minimalist number of visible windows, and only open other windows when they need them or want to see them.
.
2) FULL SCREEN VS WINDOWED: EverQuest, as of the July 2022 Patch, starts in Windowed Mode.
You can switch to Full Screen, if you want to, on the Display Tab of your Options Window (Alt O), by clicking the 'Switch to Fullscreen' button halfway down on the left side.
Many Players do prefer to play Fullscreen with reasons such as the task bar doesn't pop up, so there is no bar across the top and so forth.
However, what many seem to be unaware of, is that windowed mode may not fill your screen at first, but if you click and drag the corners of the EverQuest window, you can resize it so that it is, in fact, essentially full screen!
There are advantages to Windowed mode.
Example, if you use EQLP or Discord, you can still pop them on top when you want to.
You can also open a browser to look something up.
If you have more than one instance of EverQuest running, you can more easily swap between each EverQuest window.
Your call.
NOTE: If you have multiple screens, you options expand, such as running two instances of EverQuest with one on each screen and so forth.
.
3) MAPS: EverQuest comes with some (not all) generic basic zone maps (hit your M key to open the Maps Window).
Maps are essential for finding your way about, seeing where things are and more.
Players are able to mark maps, add to maps and so forth, using the Map Tools provided.
The problem there is that any changes you make to the default EverQuest maps are erased and over written each time you log in to EverQuest.
Thus, you need a Map Folder of your on in the EverQuest directory.
So, right away you should download and install some Player made maps, or start a set of maps of your own.
Once done, start working on the habit of updating and adding to those maps, every day, when needed... particularly when it comes to Quest NPC locations, named spawn locations, vendors, traps, zone lines, banks, vendors and so forth.
For information on using maps; adding to maps; creating your own map directory; where to get Player made maps; and all things mapping... start here!
.
4) USER INTERFACE: The appearance and lay out of your EverQuest window is your 'interface' into the world of EverQuest, thus, a 'User Interface' (aka UI).
The EverQuest UI is amazingly versatile.
You can put windows where you want them; resize windows; resize fonts; change fonts; change window shapes; minimize or maximize windows; close or open windows; change your view; hide or show models; hide or show corpses; show full, partial or no names; and on an on.
I will only go into the basic stuff here. The rest you can figure out as you go along.
Basically, you can... and need to... set up your EverQuest window in a way that suits you, that allows you to play the game in a smoother manner, with less stop and go and faster reactions. Once that is done, you can make adjustments as you go along.
The lay-out as sparse or as crowded as you want it to be.
Over time, you will get used to and become accustomed to, your EverQuest window set up, making your ability to instinctively react and innately 'know' where things are... making EverQuest play far more fluid and instinctive. This is a good thing.
Because of this, if you have more than one Character, it might also be a good idea to keep the lay out the same or similar on each Character... because if the lay out is overly different for each Character, you will be less able to react instinctively or expediently.
Once you have any window right where you want it on screen, you want to 'lock' it in place to prevent it from getting moved about as you click on things while playing. This is accomplished by right clicking the top of a window (see #1 in image below) and then selecting the 'Lock' option (#2 in the image below). An asterisk (*) will appear by the Lock Option to show that that the option is in place. This window will now stay in it's current position on your Screen. Even after you close it and then re-open it, it will re-open in the same position.
If the you want a window to always stay open, and don't want to accidentally close it when clicking away on your keyboard, right click the window again, and this time make sure there is no asterisk by the ''Esc' to Close' option. See #3 in the image, above. Thus when you hit the Escape key on your keyboard, the window in question will not close.
If you do close a window, it can always be brought back up. Most windows can be accessed (brought back up) by way of the on-screen EQ Button (the combined DB (Marketplace) / EQ (Options) Button can not be closed or hidden). Additionally, most windows usually have options to minimize / maximize (#1 in below image), close (#3 in below image) or a 'Help' option (#2 in below image... it pops up a Help window about the window in question). If they don't, the same or similar options can still be accessed by right clicking the top of the window.
In short, all of your Windows should have these two (2) options defined, one way or another. Example, you always want your Group Window open and in the same place, so Lock it and un-select the 'ESC' option. You may want to position your bag windows on-screen so they don't open up on top of each other, but do want hitting the Escape key (on your keyboard) to close them, so Lock them in place, but keep the 'Esc' option selected.
You may also consider the 'Fade Level' for each window. What this means is the window can fade to invisibility (see through, except for the words), when not in active use. If you move your cursor to the window, it will become opaque (become full view) again. However, you can also set the 'full view' fade percentage as well. Personally, I don't like windows fading at all, because if you can see something in the EverQuest environment and then try to click on it, you can potentially end up clicking something in a faded window and activate something you did not want to activate.
(1) Right Click top of window to bring up options for the window; (2) Move cursor to the 'Alpha' category; (3) Select one of the 'Level' options to adjust ('Normal' for the 'Full View' setting or 'Faded' for the fade away option); In the pop-up 'Quantity' window, adjust the number to the fade level you want, from 0 (invisible) to 100 (no fade at all).
Below are some windows that you that you may want to position, lock in place and remove the 'Esc' option so remain open (in view) at all times. Any other windows can be positioned and locked in place, but you may want to retain the 'Esc' option, since you don't want them open at all times.
Actions Window (that has additional tabs on it for Abilities, Combat & Socials);
One (or more) Hot Button Windows for your on-screen access to Hot Buttons;
Spell or Song Bar (if you can cast spells or play songs);
Combat Abilities Window (aka Disciplines, if you can use Disciplines);
Bandolier (to be able to swap weapon sets on the fly);
Chat Window(s) and / or Tabs (to save screen space, I strongly suggest you do not use 'Tell Windows' and add tabs, rather than more chat windows to separate certain certain types of 'spam' into different windows (see here, for more);
Pet Window, if you have and use pets (button controls for your pet);
Group Window (so you can see everyone in your group);
The 'You' (Alt Y) window (so you can see and monitor you own health, mana and / or endurance);
On Screen Compass (so you can see which direction you are facing, to get around better);
The Target Window (so you can see details about your current target... health, buffs, DoT's...);
Target's Target window (so you can see what target your current target is focused on, if any);
Extended Target Window (so you can see all of the MoB's that are aggroed on your group or raid... as a note, the order that they appear is the same for everyone in the group or raid);
Effects Bar (aka Buff Bar) (so you can see what Buffs or DoT's are currently affecting you);
Song Window (so you can see any song and / or certain aura effects that are currently affecting you);
The 'Lag Meter' (F11) where you can see the quality of your connection in milliseconds (the smaller the number, the better);
Window Selector (Alt W), that provides easy access to an assortment of windows;
Quest Overlay (this window is faded from the start, but is highly useful to show where you are in a quest(s) that you are actively working on, rather than having to constantly pop the Quest Window open and closed, to keep track).
So, set up your screen the way you want it. You can always make adjustments along the way, but the idea is to generally leave it intact. In this way, you become accustomed to it and instinctively know where things are with little to no 'hunt and peck' process. Myself, I am a 'cluttered' window user and I like windows organized around the edges with an open view in center screen. I also have other windows that are positioned and locked in place (all over the screen) but are not always open (such as my inventory, bank and shared bank bags).
1) GEARING UP: Once you have a new Character, you need to 'gear up,' meaning to acquire and equip armor, weapons, a charm, a power source, click items, augmentations and similar.
Gear is the primary way that you can increase your Character's durability.
Just be aware that many of these items are limited by way Class, Race, Deity and / or Character Level.
So, be wary not to acquire an item you will not be able to use!
The easy way to tell this is the item name (in the item window) will be in red text, meaning you can't use it.
Updating and improving gear will be a constant never ending pursuit, from the start.
The preferred stats you seek on gear will vary by Class type (example, Clerics may give preference to items that boost Wisdom to help increase their mana pool, as well as Healing bonuses / effects to increase how much they can heal for).
You can acquire and update gear as you go along, in the following manner:
Work on your skills. They may not seem overly important, but they can help in many areas... Combat, Magic, Casting, Tradeskills and so forth.
Some happen automatically (Defense...), some happen if you wield the correct weapons (1H vs 2H...) and some have to be purposely worked on (Languages, Tradeskills...).
You can run multiple EverQuest programs at the (same Computer or not) and Play on more than one (1) Account at the same time.
If you are skilled enough to do this, you can 'box' your Characters, meaning you can play them at the same time, together, so they can help each other.
If you note any errors, misspellings, item name errors, misinformation or anything that needs addressing on this page -- PLEASE let me know via an in-game EQ Message (Bonzz on the Bertoxxulousserver), or post on Bonzz's Discord Server!
This fan site is created and provided free (uncompensated, no ads, no sponsors, no registration / log-in), by Bonzz of Bertoxxulous. Images / graphics / sounds on this web site are in-game (EverQuest) captures, originate from Sony / Darkpaw / Daybreak Games (EverQuest) and / or with permission from others (if any). Some graphics may be modified (re-sized, cropped, etc.) from their original form. Any pages that play sounds / music, are intentionally set at low volume. Most of them are under two (2) minutes or less, and should play once and then stop. If any sound / music continues to loop (play over and over), let me know! EverQuest is copyright / trademark / owned / operated by Darkpaw Games, which is owned / operated by Daybreak Games, which is owned / operated by Enad Global 7.